7 Sneaky Home Theater Setup Blunders (and How to Outsmart Them in 2025)
You buy the shiniest 8K projector, splurge on Dolby Atmos speakers, and fantasize about opening night in your living room—only to be underwhelmed by flat sound and stretched visuals. Sound familiar? My very first home theater left me scratching my head: Why did my supposedly ‘immersive’ setup sound more like an old drive-in? (Spoiler: My speakers pointed at the ceiling and the screen barely fit the wall.) Years—and a few embarrassing mishaps—later, I’ve learned most folks trip over the same sneaky issues. Let’s dive into real, fixable mistakes you might be making, plus some tricks I wish I knew from the get-go.
Speaker Placement Snafus: Learning the Hard Way
Speaker Placement Errors are the #1 reason home theaters sound underwhelming—no matter how much you spend on gear. If you’ve ever wondered why dialogue sounds muffled or action scenes lack punch, chances are your speakers aren’t where they should be. Let’s break down the most common Speaker Placement Snafus and how to outsmart them using proven Speaker Placement Guidelines, including Dolby Atmos Installation tips for 2025.
Front Channel Placement: Don’t Swallow the Dialogue
Front speakers are the backbone of your audio experience. Point them at odd angles or place them too high, and you’ll notice dialogue sounds like it’s coming from the floor or ceiling. I learned this the hard way—my first setup had the left and right speakers aimed at the ceiling, and every movie sounded like it was underwater. Once I followed Dolby’s official guidelines and angled them directly at ear level, the difference was night and day.
- Place left and right speakers at ear height when seated.
- Angle them toward your main listening position for a focused soundstage.
- Keep the center channel directly under or above your screen, also at ear level, for clear dialogue.
Center Channel Alignment: The Dialogue Anchor
The center channel handles most of the dialogue and should be perfectly aligned with your screen. If it’s off to the side, too high, or too low, voices will sound disconnected from the action. According to Dolby’s guidelines, the center channel should be as close to screen-center as possible and at the same height as your ears.
Rear Speaker Height: The Surround Sound Bubble
Mounting rear or surround speakers too high or too low is a classic Surround Sound Setup mistake. Too high, and effects feel distant; too low, and you lose the immersive bubble. For true Dolby Atmos Installation:
- Rear and side speakers should be behind and just above ear level—no more than 2 feet higher than your seated position.
- Angle them slightly toward the listener for a seamless surround field.
Spacing and Symmetry: Don’t Break the Sound Field
Improper speaker spacing—like crowding speakers together or placing one in a corner—breaks the soundstage and ruins immersion. Always measure your room and follow these Speaker Placement Guidelines:
- Equal distance from the main seat to each front speaker.
- Rear speakers spaced evenly behind the listening area.
- Side speakers at the same height and distance from the listener.
‘The single biggest difference in sound quality is where you put your speakers—not how much you paid for them.’ — Bob Katz (Mastering Engineer)
Ignoring Dolby or THX placement guidelines is a fast track to flat, lifeless audio. Take the time to measure, angle, and align your speakers. The payoff is a home theater that sounds as good as it looks—and you’ll never have to learn the hard way again.
Screen Size & Room Measurement Fails: Close, But Not Quite
Let’s be honest: picking the right screen size and measuring your room feels like a no-brainer—until you’re craning your neck or squinting at a washed-out image. Screen Size Selection and Room Measurement are the foundation of a great home theater, but they’re also two of the most common places people slip up. Here’s how to avoid the “almost perfect” setup and get it right the first time.
Why Screen Size Selection Matters
It’s tempting to go big. But a massive projector screen in a small room can turn movie night into a pain in the neck—literally. Too large a screen means you’re forced to move your head to follow the action, leading to discomfort and a less immersive experience. Plus, if your projector’s brightness isn’t matched to the screen size and your room’s ambient light, you’ll end up with dull, blurry scenes instead of crisp visuals.
‘Measure twice, buy once. Screens can look perfect in showrooms but dreadful at home if you guess the fit.’ — Sarah Pearce (Home AV Designer)
Room Measurement: The Step You Can’t Skip
Before you even think about buying a projector or screen, grab a tape measure. Measure your wall space, ceiling height, and the distance from your seating area to the screen location. Skipping this step leads to screens that “almost fit”—but not really. I learned this the hard way: my first 100” screen overwhelmed my living room, and the picture looked washed out. Once I measured and sized down, everything clicked into place.
- Pro Tip: Ideal viewing distance is usually 1.5–2.5 times the width of your projector screen.
- For a 90” screen, that’s about 11–19 feet from your seats.
Projector Throw Distance: Don’t Guess
Projector Throw Distance—the space between your projector lens and the screen—directly affects image size and focus. Guessing here is a recipe for disaster. Every projector model has a recommended throw ratio (often 1.5–2.5x the screen width). If you ignore this, you’ll end up with a blurry or cropped image, or worse, a projector that just won’t fit your space.
- Check your projector’s manual or use the manufacturer’s online calculator to find the ideal placement.
- Account for furniture, doors, and any obstacles that could block the projector beam.
Ambient Light Control & Projector Brightness
Even with perfect measurements, ambient light can wash out your picture if your projector isn’t bright enough for your screen size. Use blackout curtains or shades, and make sure your projector’s brightness (measured in lumens) matches your room’s lighting conditions and screen size. A dim projector on a big screen in a bright room is a common—and avoidable—mistake.
Quick Checklist for Outsmarting Screen Size & Room Measurement Fails
- Measure your room and seating distance before buying.
- Use manufacturer calculators for projector throw distance and screen size selection.
- Match projector brightness to your screen size and ambient light control.
- Test with painter’s tape or cardboard cutouts before installing the real screen.
Remember: a little planning saves a lot of headaches. Don’t let your dream setup be “close, but not quite.”
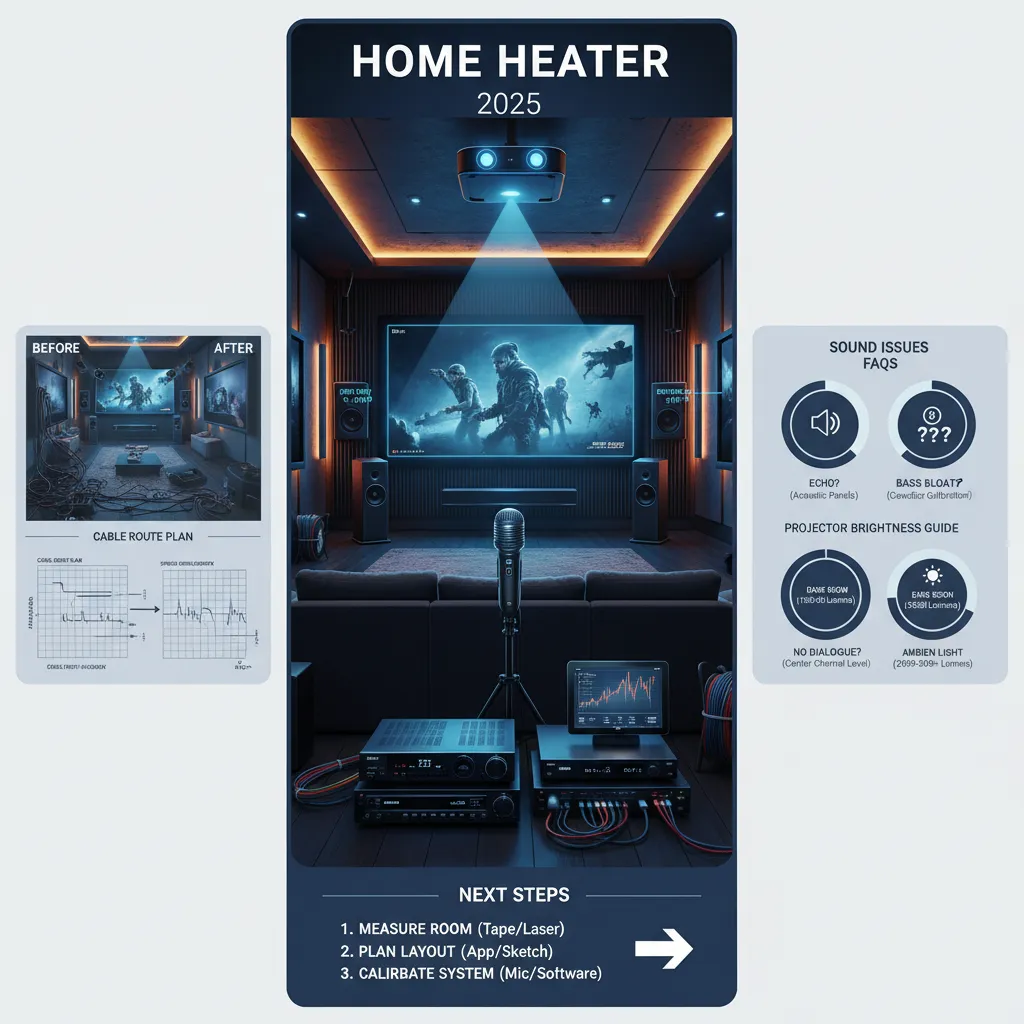
Cable Chaos & The Calibration Conundrum
Let’s face it: tangled cables and skipped calibration are the silent killers of home theater performance. Even with the latest gear, these two blunders can sabotage your setup before the opening credits roll. Here’s how to outsmart them in 2025 with smart Cable Management Tips and a focus on Room Calibration Importance.
Why Cable Quality Impact Matters
Think all HDMI or speaker wires are the same? Think again. Cheap, low-grade cables often cause interference, signal loss, or even safety hazards. That fuzzy sound or flickering video? Nine times out of ten, it’s a cable issue. Always use certified high-speed HDMI cables—especially with 4K or 8K setups. Avoid bargain-bin wires, and check that your cables meet the latest HDMI specs (2.1 or higher for most 2025 gear).
Pro tip: “If you can’t trace it, you can’t fix it. Good cable management saves hours of frustration down the road.” — Justin Davis, AV Integrator
Cable Management: More Than Just Looks
Tangled cables aren’t just ugly—they’re a recipe for noise, tripping hazards, and hours of troubleshooting. Poor routing can introduce hums, buzzes, or even short circuits. Here’s how to keep things clean and safe:
- Plan cable routes before you start. Map out where each wire will go, and measure twice.
- Label every cable at both ends. Use tags or colored tape for easy tracing.
- Use in-wall wiring or raceways to hide and protect cables. This boosts both safety and signal clarity.
- Bundle and secure cables with Velcro straps—never use metal ties, which can damage wires.
Remember: a single crossed wire can waste hours. I once spent an entire afternoon chasing a hum that turned out to be a speaker wire draped across a power cord. Lesson learned!
Room Calibration Importance: Don’t Skip This Step
Even the best speakers sound off-balance if you skip calibration. Modern AV receivers (AVRs) since 2022 come with auto-calibration tools that use a microphone to map your room’s acoustics. But don’t just hit “start” and walk away—manual tweaks can make a huge difference.
- Run the auto-calibration process with the mic at ear level in your main seating spot.
- Check the results: Are the speaker distances and levels accurate?
- Fine-tune manually if needed—sometimes the system misses a subwoofer or sets the crossover too high.
Calibration unlocks your system’s full potential. Skipping it means you’re not hearing what your gear is truly capable of. Even a $5,000 sound system can sound “meh” if it’s not dialed in to your room.
Quick Setup Tips
- Invest in quality cables—don’t let a $10 wire ruin a $2,000 system.
- Plan and label all cable runs before installation.
- Use in-wall wiring for a clean, safe look.
- Always calibrate your audio, even if it takes extra time.
Overlooking Cable Quality Impact and Room Calibration Importance is a common pitfall—don’t let it happen to you!
DIY Fixes and Wild Cards: Improv Solutions & Budget-Friendly Wins
Think you need a massive budget or pro installers to get a killer home theater? Think again. Some of the best setup tips and budget solutions come from real-world, do-it-yourself fixes that anyone can pull off. In fact, quick tweaks and a little creativity can outsmart even the sneakiest home theater setup blunders—often for less than the price of a single movie night out.
Let’s start with a classic mistake: mismatched speakers. You might think only audiophile gear will do, but swapping in identical front and center speakers—even basic models—can instantly improve your soundstage. I tried this myself after reading a pro tip online, and the difference in dialogue clarity and surround immersion was night and day. It’s a simple, affordable upgrade that pays off every time you hit play.
Another common headache is window glare washing out your projector screen. Instead of pricey specialty blinds, I made a DIY baffle using blackout curtains from a local home store. For about $40, I blocked out stray light and boosted my contrast dramatically. This is one of those before after examples you have to see to believe—your eyes (and your wallet) will thank you.
Room calibration is another area where you don’t need to break the bank. Borrowing a friend’s calibration mic or snagging one online for $20 can help you tune your system without hiring a pro. Many AV receivers include free calibration software—just plug in the mic, follow the prompts, and let the system optimize your sound for your unique space. Sometimes, asking friends for tools or setup tips is smarter than buying more gear you’ll use once.
Here’s a wild card that’s easy to miss: upconverting stereo. Most modern AV receivers have a setting that can turn basic stereo input into a full surround experience. If you’re streaming music or watching older content, don’t skip this feature. Upconversion, paired with good speaker placement, can make even budget systems sound like a true theater. It’s a game-changer for movie nights and everyday listening alike.
As home theater blogger Maria Chen puts it:
‘Budget tweaks can rival pro upgrades if you pay attention to details most people skip.’
From DIY blackout blinds to upconverting stereo, these budget-friendly wins prove you don’t need to overspend to outsmart common setup mistakes. Quick fixes and pro tips can transform any space—sometimes all it takes is a borrowed tool, a bit of research, and a willingness to experiment. For me, using identical speakers and upconverting stereo changed my movie nights forever. Don’t be afraid to try these wild card solutions in your own setup; you might just discover your favorite upgrade yet.
In conclusion, the smartest home theater setups in 2025 aren’t always the most expensive—they’re the ones where a little DIY spirit and clever problem-solving make all the difference. Avoid frustration and wasted money by embracing these practical, creative solutions. Got your own budget solutions or setup tips? Share them below or check out our full guide for more before after examples and wireless solutions that work.
TL;DR: Skip the trial and error: measure your room, calibrate your gear, and plan cable routes before you plug anything in. Use these pro tricks to make your home theater look and sound incredible, starting on day one.


Comments
Post a Comment